Materials
- Wood. Something that's 3/4" thick is good. I've used 1/2 boards in the past and they certainly work but 3/4 is only a little more pricey and I'm less worried I'll hammer through the board. I had several feet of a poplar 1" x 6" leftover from another project.
- Dowel (optional)
- Nails. We already had some 1" ring shank nails. You'll want a decent size head on the nail to keep the string from falling off (no trim nails, please). Sometimes its good to push the string up or down the nail so a smooth shaft would probably be better.
- String. Preferably something like crochet thread or embroidery thread.
- Wood finish of your choice (optional). Poplar takes paint well but not so much stain. We used Rust-oleum 2x Coverage spray paint (I love this paint!) of just polyurethane.
- A design. We pulled images off the interwebs.
Process
- Prepare the wood
- I had some 1" x 6" poplar and just kept the actual width of 5.5". This was cut into 5.5" x 5.5" squares with a miter saw. A handsaw would work too.
- I drilled a hole about 1/2 deep in the back of the board approximated 1" from the bottom. In this hole, we can insert a short piece of dowel as a stand/prop for the board once it's complete.
- Sand the edges. I didn't worry too much about getting the edges super smooth but I did sand to round the corners and edges a bit.
- Finish. Poplar doesn't take stain very well but it does take paint great. We used Rustoleum's 2x coverage spray paint for 4 of the squares. I love, love, love this paint. I've used it on wood, metal, and plastic in the past and have had great results. The other two squares, we coated with polyurethane to keep the wood grain.
- Prepare the design
- We pulled our designs off the internet and I sized them appropriately in Paint.net to be 5.5 x 5.5. Keep it simple. Save the complex string art for later.
- Otherwise, feel free to draw your own design. Again, keep it simple.
- Nail
- You can tape the paper to the wood but once a couple nails are in place, it's not going anywhere.
- Carefully, hammer the nails into the board. They don't actually need to go very deep to be solidly in place...maybe 3/8 - 1/2" deep.
- Just follow your drawing and be patient.
- I'm right handed and find it easier to move from left to right as add the nails. It just allows me better vision to finesse nails into tight spaces.
- Carefully remove the paper.
- String!
- Pick a nail and tie on the string. I good square knot is fine. Just get it tight without pulling too much on the nail. Trim off the excess string. You don't need to trim it too close as you can tuck the leftover into the other string to hide it. If it's too close, it could pull itself through the knot.
- If you're the cautionary type like me, a tiny drop of super glue on the knot might help you to sleep better.
- There are at least two ways to string art.
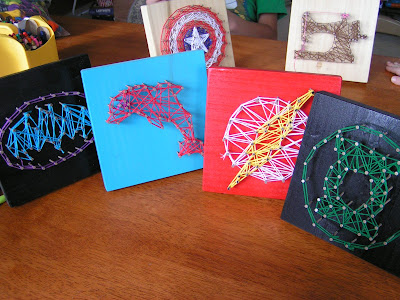
- The first is a lot like a Paint by Number. You're really filling in the space with as much string as you can. This is the simplest and what all the kids did with their art. The Batman and Green Lantern symbols both included oval outlines and involved a little more looping: Nail one then around nail 2, back to nail one to make a loop. Then on to nail 3 and back to nail 2 to make a second loop. etc. Essentially, a back stitch around nails.
- The second is more...um...mathematical. You're using the string to approximate curves as well as fill in space. This is how we filled in the rings on the Captain America Shield.
The kids and grownups had a lot of fun with this. And now they have something pretty awesome for their bookshelves.


No comments:
Post a Comment